Floor tiles can sometimes loosen, lift, or even push up from the floor. When that happens, replacing the tile alone may not solve the problem because the cause is often underneath it or in the way the floor was installed.
Floor tiles can pop up because of poor mortar coverage, movement in the subfloor, missing expansion or movement joints, an uneven substrate, or moisture. The right fix depends on what caused the tile to lose its bond or lift in the first place.
Let’s go through the most common causes and what you can do about each one.
Why Floor Tiles Pop Up?

The way the tile has lifted can often tell you where to start looking for the problem. If one tile has come loose, the issue may be limited to the mortar underneath it. If several tiles have lifted together, the floor may be moving or pressure may have built up because there was not enough room for expansion.
Before fixing the tile, check how much of the floor is affected. Replacing a loose tile without dealing with the cause underneath it can leave you with the same problem again.
Poor Mortar Coverage or Bond
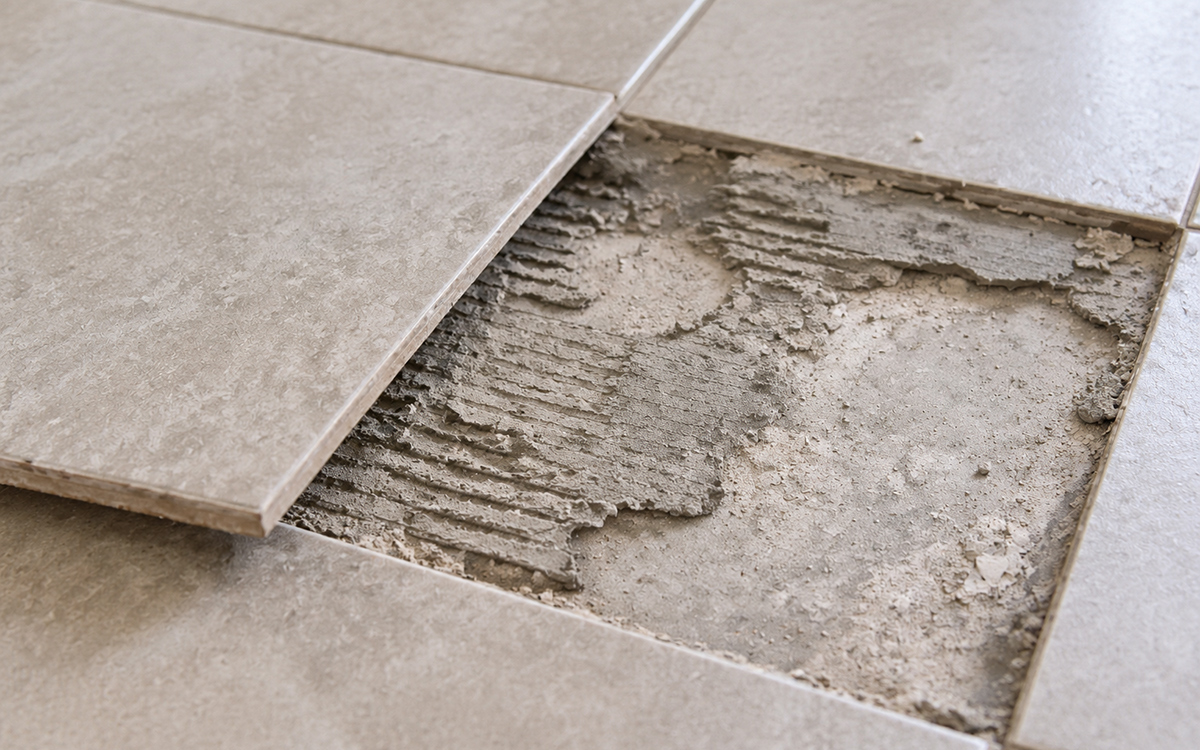
Tile needs good contact with the mortar underneath it. If too little mortar was used, the mortar started drying before the tile was set, or the tile was not pressed firmly enough into place, parts of the back can remain unsupported. Over time, the bond may weaken and the tile can start to sound hollow, move underfoot, or come loose.
Solution
Remove the loose tile and look at the back of it and the floor underneath. Large clean areas or obvious empty spots are a sign that the tile did not have enough mortar coverage.
Clean off the old mortar, make sure the surface underneath is solid, and reset the tile with a mortar made for that type of tile and substrate.
Subfloor Movement or Deflection
Tile needs a solid floor underneath it. On wood-framed floors, the subfloor can flex slightly when you walk across it. If there is too much movement, grout may start cracking, tiles can become loose, and eventually some of them may lift.
If the same area keeps cracking or the floor feels soft or springy underfoot, the problem may be below the tile rather than in the tile itself.
Solution
Check the subfloor for loose, damaged, or warped sections. These need to be repaired before the tile is put back.
If the floor still flexes too much, it may need additional support or reinforcement. Cement backer board or an uncoupling membrane can provide a better surface for tile, but they will not fix a weak floor structure on their own.
Uneven Subfloor or Substrate
Tile does not need a perfectly level floor, but it does need a flat one. High spots, dips, or abrupt changes in the surface can leave parts of the tile unsupported and make it harder to get good mortar coverage underneath.
You may notice uneven grout lines, one edge of a tile sitting higher than the next, hollow spots, or tiles that loosen in the same area over time.
Solution
Check the floor before setting new tile. High spots should be ground or sanded down, and low areas should be filled with a patching or leveling product that is approved for the substrate.
Do not try to correct an uneven floor by adding pieces of plywood under individual areas. The surface should be made flat before the tile is installed.
Moisture Damage to the Subfloor
Water under the tile can also cause it to loosen or lift. This may happen because of a leaking pipe, water getting through the floor, or another moisture problem nearby.
If the tile is installed over plywood or another wood subfloor, too much moisture can make the wood swell, warp, or become soft. Once the surface underneath starts moving or changing shape, the tile above it may lose its bond.
Solution
First, find where the water is coming from and fix the problem. Then check the subfloor. If the plywood is swollen, warped, soft, or damaged, the affected section should be replaced before you install the tile again. If the wood is still in good condition, let it dry completely and check the moisture level before continuing.
Do not reinstall the tile until the surface underneath is dry, solid, and stable.
How to Fix Popped Tiles?
Floor tiles are usually set into mortar or tile adhesive, while the gaps between them are filled with grout. When a tile pops up, the grout around it may crack or come loose as well.
Fixing a popped tile starts with removing it carefully and checking what caused it to lift. Once the problem underneath has been corrected, the tile can be set back in place with the proper mortar or adhesive and re-grouted.
Step #1. Remove the Popped Tile
To fix a popped tile, you first need to remove it without damaging the tiles around it.
Start by removing the grout around all four sides of the loose tile. Once the edges are clear, carefully work a small chisel and hammer under one edge. Keep the chisel at a low angle and tap it lightly until the tile begins to lift.
If the tile is already loose, you may be able to lift it out without much force. Do not pry hard against the neighboring tiles, as their edges can chip or crack.
Tip. If the tile does not come up easily, stop and check whether grout or mortar is still holding it in place. Forcing it out can turn one loose tile into several damaged ones.
Step #2. Prepare the Area for New Mortar
After removing the popped tile, clean away the old mortar or adhesive from the floor and from the back of the tile if you plan to reuse it. A putty knife can help remove loose residue, but take care not to damage the surface underneath.
Vacuum or wipe away the remaining dust so the new mortar has a clean surface to bond to. If you use a damp cloth, let the area dry before continuing.
This is also a good time to check the floor underneath. If you find cracks, loose underlayment, moisture damage, or movement in the subfloor, fix that problem before reinstalling the tile.
Tip. The surface does not need to look new, but it should be clean, solid, flat, and free of loose material before you set the tile again.
Step #3. Apply New Mortar or Tile Adhesive

Use a mortar or tile adhesive that is approved for your type of tile and the surface underneath it. Follow the manufacturer’s instructions for mixing and application.
Spread the mortar evenly with the correct size notched trowel rather than placing a small strip of adhesive under the tile. The goal is to get good contact across the back of the tile without leaving large unsupported areas.
For larger tiles, it may also be necessary to apply a thin coat of mortar to the back of the tile before setting it in place.
Tip. Do not choose the adhesive based only on the tile itself. The product also needs to be suitable for the substrate underneath, such as concrete, cement backer board, or an approved wood-floor tile system.
Step #4. Set the Tile Back in Place
Place the tile into the fresh mortar and press it down firmly. Move it slightly from side to side as you press so the mortar spreads well underneath.
Check that the tile sits at the same height as the tiles around it. If necessary, tap it gently with a rubber mallet or a beating block. Do not hit the tile directly with a hammer.
Tip. Before the mortar starts to set, clean any excess that squeezes up into the grout joints. You need enough empty space around the tile for new grout later.
Step #5. Grout the Tile
Let the mortar set for the amount of time recommended by the manufacturer before applying grout around the repaired tile.
Try to match the existing grout color and fill the joints completely. Wipe away the excess from the tile surface before it dries.
Tip. Do not leave the joints around the repaired tile empty. Grout helps support and protect the edges of the tile. If the joint is meant to allow movement, use the flexible sealant specified for that location instead of grout.
Step #6. Let the Repair Cure
Do not walk on the repaired tile until the mortar and grout have had enough time to cure. Check the instructions on the products you used, since drying and curing times can vary.
Once everything has cured, the tile should feel solid underfoot and sit evenly with the rest of the floor.
How to Protect Floor Tiles from Popping Up?
Most problems with popping tiles start underneath the floor. A subfloor that moves, poor mortar coverage, missing movement joints, or moisture damage can all cause tiles to loosen or lift over time.
If you are installing a new tile floor, make sure the surface underneath is solid, flat, and dry before you begin. Use the right mortar for the tile and substrate, get good coverage under each tile, and leave the movement joints and perimeter gaps required for the installation.
If the tile is already installed, watch for cracked grout, loose tiles, new hollow spots, or signs of a leak. These can show up before a larger section of the floor starts to fail.
Catching the cause early is much easier than replacing several tiles after they have already lifted.
Start with a Solid, Flat Surface
Before installing tile, check the floor underneath it. The subfloor should be solid, dry, and flat, without loose sections, high spots, or areas that flex when you walk over them.
Problems underneath the tile do not disappear after it is covered. If the floor moves or has uneven areas, fix them before installation.
Get Good Mortar Coverage
Use a mortar that is suitable for both the tile and the surface underneath it. Spread it evenly with the correct notched trowel and make sure the tile has good contact with the mortar when it is pressed into place.
Large empty areas underneath a tile make it much easier for the bond to fail later.
Leave Room for Movement
Tile floors expand and contract slightly as temperature and moisture change. The installation needs movement joints and space around walls and other fixed surfaces so that this movement does not push against the tile.
Do not fill required movement joints with regular grout. These areas need the flexible material specified for the installation.
Fix Water Problems Early
A small leak can cause much more damage if water reaches a wood subfloor and stays there. Repair leaking pipes, appliances, doors, or other sources of moisture as soon as you find them.
If grout begins cracking repeatedly or a tile starts feeling loose or sounding hollow, check the area instead of waiting for several tiles to lift.
Final Thoughts
A popped tile is usually a sign that something underneath the surface is not working the way it should. That is why the repair matters more than simply putting the tile back in place.
If the floor is solid, dry, and properly prepared, a repaired tile should stay put. If the same area starts cracking or lifting again, the problem is likely deeper than the tile itself and worth checking before more of the floor is affected.